Tips for using this guide: This guide is meant to be self-guided for students above grade 8. Students between grade 3-7 might need some guidance ( download worksheet: pdf or doc), and students under grade 3 will need teacher/parent assistance (download worksheet: pdf or pptx). You may also want to check out our “Build your own solar system” challenge, which can supplement this one.
When you look at the night sky and see far away stars, do you ever wonder if there are planets around those stars too? Planets around other stars are called exoplanets, and so far over four thousand have been discovered! Our best guess is that are likely hundreds of billions in the Milky Way alone. You are probably familiar with the planets in the Solar System, but exoplanet systems are very diverse and don’t always look like the planets we know and love. In this activity you’ll learn more about exoplanets and you’ll get creative in imagining what these other worlds may be like!
Questions? You’ll be able to contact UBC physicists and astronomers if you have any questions about creating your exoplanet. We will also showcase your design on this page or via social media – you can share using a drawing of the exoplanet’s light curve, a diorama of your exoplanet, or any other creative ways you would like!
This UBC student (from our department!) recently discovered 17 new exoplanets!
This song is a great overview of things we will learn in this challenge!
Things you need for creating your own exoplanet:
- This webpage. We’ve chosen a few key ideas in astronomy that will help create your own exoplanet.
- Decide which activity you’d like to do (or both!). You can choose to create a diorama showing the surface of your planet, or to create your planet’s light curve. Detailed instructions are included on this page.
- Pen and paper to design your exoplanet. What is your exoplanet like? Start with a design and draw or write out all the cool facts of your exoplanet!
- Supplies. If you are making a diorama, you can gather supplies from your home. If you are creating a light curve, you will need to download an app. You will need a light source (flash light or lamp) and something that represents your planet (small ball of any type).
- Safety first. Make sure you use safe materials! If you are not sure, ask adults for help.
- Make it a group project! Connect with friends online and coordinate to build a solar system, complete with multiple exoplanets!
Before creating your own
Before you get started imagining your own exoplanet, let’s learn about what exoplanets are and what we know about them.
What is a planet anyways?
To learn what an exoplanet is, we need to start with what a planet is. There are three requirements for an astronomical object to be a planet:
- It needs to orbit a star.
- It needs to be large enough to be shaped like a ball.
- It needs to ‘clear its path’ around the Sun.
In our own solar system, Mercury, Venus, Earth, Mars, Jupiter, Saturn, Uranus, and Neptune all fulfill these requirements. Jupiter’s moon Ganymede and Saturn’s moon Titan are both larger than the planet Mercury, but because they orbit other planets rather than the Sun directly, they are moons. Lots of objects in the asteroid belt do orbit the Sun, but they are not large enough in mass for their self-gravity to make them spherical in shape, and they are not able to clear their path around the sun. Finally, Pluto was excluded as a planet because it is not massive enough to clear its disk-shaped orbit around the Sun of small, icy solids.
Exoplanets, also known as extrasolar planets, are planets in other solar systems (which means they orbit around other stars).
Experiment and explore! Want to learn more about our own Solar System? Make sure to check out the previous challenge “Build your own solar system.”
How to find an exoplanet
Finding exoplanets is extremely difficult. It’s like trying to detect a penny on the moon! How do we find exoplanets then? The most common methods of detection are direct imaging, radial velocity, and the transit method. Sometimes, if a planet is really big and not too far away, and orbiting far away from its star, we can see it directly using a really sensitive telescope – this is called the direct imaging method.
For other planets though, astronomers have to get clever. One trick they use is to watch the star very closely and see if it “wobbles”. If it wobbles a little bit, it means there must be a planet orbiting around it, and the star and the planet are tugging at each other through gravity. This is the radial velocity method.
Another trick is to watch and see if the star gets less bright sometimes, since this could mean a planet is getting between us and the star and blocking out some of the light. This is called the transit method. We can also use these strategies to learn about the exoplanet, like how often it goes around its star and how big and how heavy it is.
Explore and experiment: Explore the different ways to find exoplanets through this interactive NASA website!
Types of exoplanets
Where would you like to go for your next vacation? If you enjoy a good game of “the floor is lava”, you might want to consider 55 Cancrie. Are you a Star Wars fan who always wanted to see that double sunset on Tatooine? Consider taking in the views on Kepler 16b.
While you might be familiar with the 8 planets in our solar system, planets around other stars come in many more varieties. There are “hot jupiters” – giant planets made of gas that orbit near their star. Or there are “super-Earths”, which are rocky worlds more massive than the Earth, and many more.
Experiment and explore: You can explore different exoplanets at the Exoplanet Travel Bureau (by the way, this is VERY COOL, especially if you access the page using mobile devices, so definitely check it out), or visit NASA’s eye on exoplanet (app, web) for more exoplanets to explore.
You can also create your own planet using this NASA interactive (javascript required) – adjust the setting to see how the planet changes!
Exoplanet climate and the Goldilocks zone
Not every exoplanet is as lucky as Earth. We have luscious forests, warm tropical beaches, and even humans because of our distance from the Sun. If we were further away from the Sun, all our water would freeze like on some of Jupiter’s moons. If we were closer to the Sun, all of our water would evaporate like on Venus. We are in what is known as the Goldilocks Zone, the perfect distance away from our Sun to have the liquid water that makes life possible. Astronomers have been looking for exoplanets in other stars’ Goldilocks Zone – these planets might be able to support life!
Experiment and explore (advanced): Check out this visualization of all known exoplanets and their host stars, and explore what it means to be in the habitable zone.
Is there life on exoplanets?
Water isn’t the only thing life needs to survive. When we study an exoplanet’s atmosphere, there are many different elements we look for to try and model the planet’s climate. Exoplanets come in a wide variety (read the Types of Exoplanets section above!) so knowing their distance from the star is only half the story. Knowing what elements are in the atmosphere helps us figure out if these distant worlds have oceans, clouds, glaciers, or even life!
Another important question is, should we try to find life on other planets? Check this video for more on the debate, and how NASA sent a map to Earth into space.
Let’s create an exoplanet!
For this particular challenge, we have two choices for activities! You can either create a diorama depicting what it is like to be on your exoplanet, or you’ll explore one of the exoplanet detection methods by creating your own lightcurve.
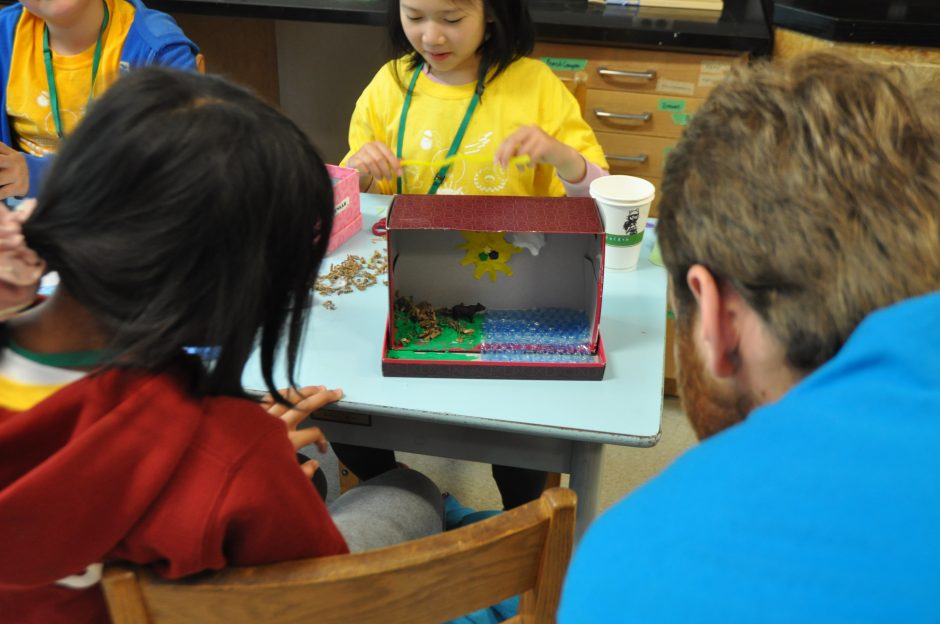
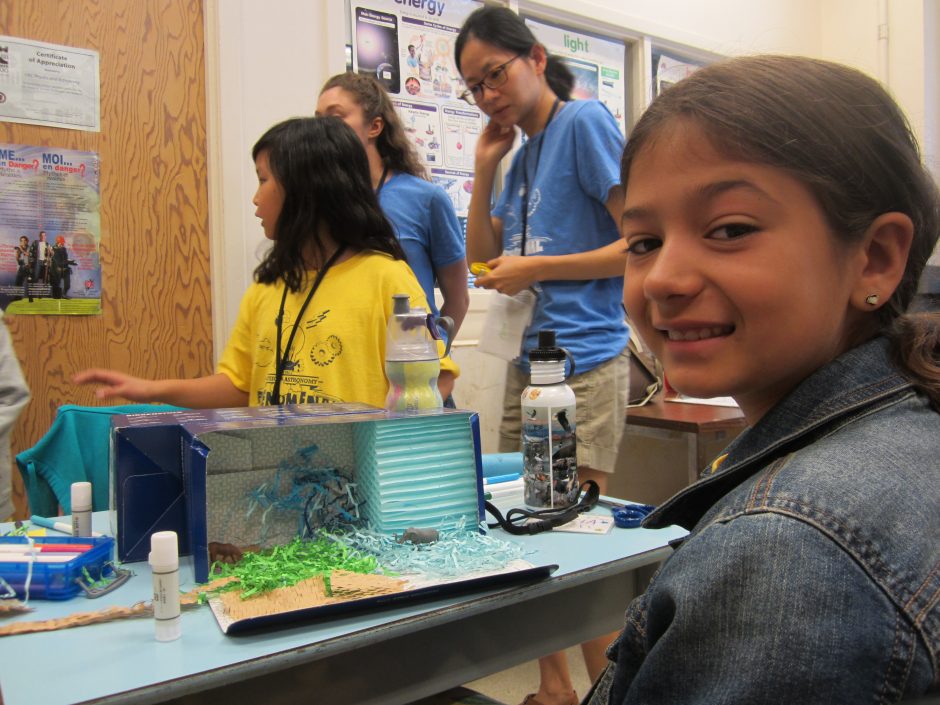
Challenge A: Exoplanet Diorama
Creating a diorama
A diorama is a way of making a 3D picture of something. It’s built inside of a box, like a shoe box or tissue box, and depicts another place. In this activity you’ll create a diorama of what it’s like on the surface of your own planet!
Here is an example of making an arctic diorama. In our case, we will be making one for your exoplanet.
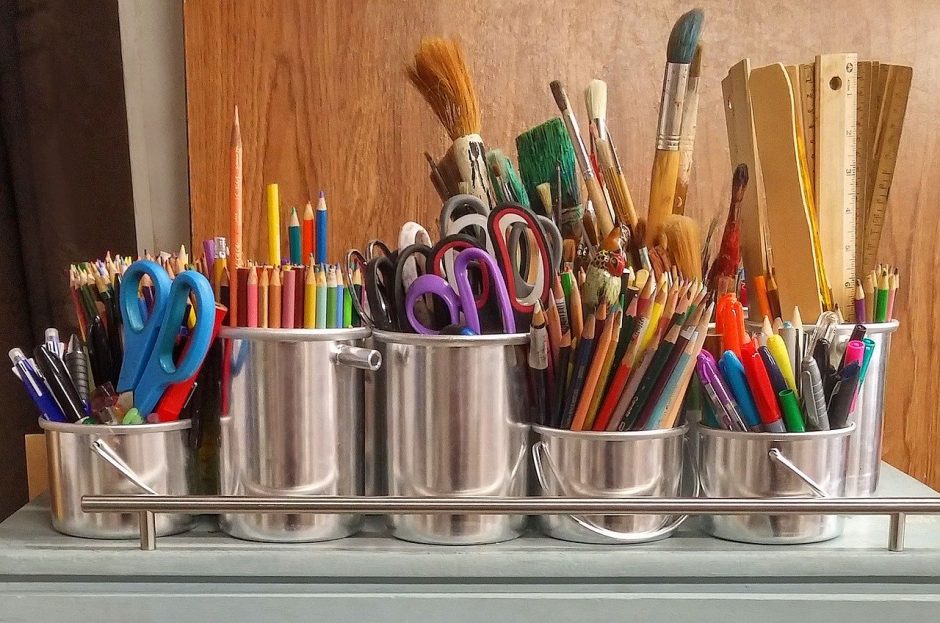
Materials
You can make your diorama out of just about anything you have at home. One thing you definitely need is a box, like a tissue or shoe box. Other materials you could use are:
- All kinds of paper: craft, crinkly or shredded paper of different colours
- Pencil crayons or crayons
- Paint
- cotton balls
- Paper or plastic cups
- Modeling clay
- Small toy figurines
Creating your exoplanet diorama
Things to decide:
- Will your planet be hot, warm or cold? You can use red paper or crayon to show the planet is hot, blue paper or crayon to show the planet is cold.
- Will there be living things on your planet? If so, what will they look like? Do they look different from living things on Earth? You can use modeling clay or paper (origami or draw) to make these living things. You can also use toy figures you already have in your diorama!
- What will the sky of your planet look like? Will there be a sun? (how many?). Will there be moons?
If you’d like some inspiration, remember to check out some real exoplanets using this app from NASA, or check out the exoplanet travel bureau, where you can see some depictions of the surfaces of different exoplanets. Once you are done, take a photo or make a video and explain what different parts of the diorama represents!

Additional resources (for guardians and teachers)
- Sci-Art Creative Teaching Resource (scoll down to “Exploring Exoplanets: Is there life on other planets?” section)
Challenge B: Exoplanet Light Curve (Advanced)
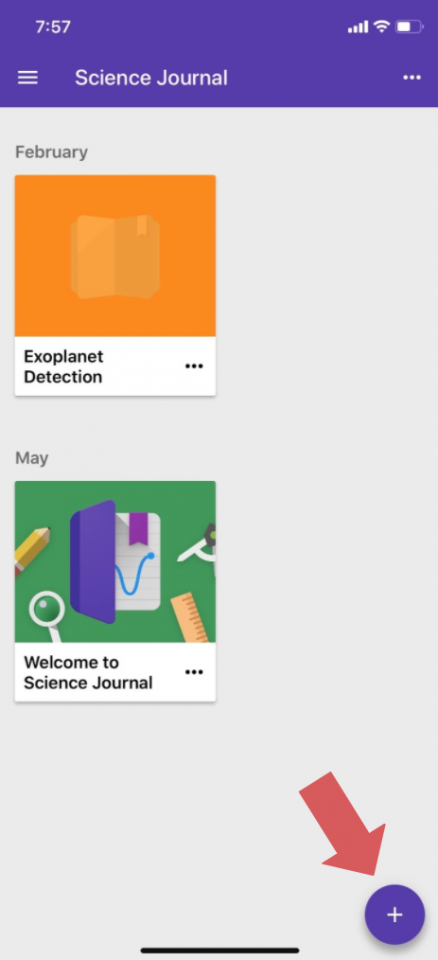
For this activity, we will be using an app called “Science Journal” to create an exoplanet light curve! This app can actually be used for many other fun science activities! Check out other ideas here: Science Journal Experiments
Download the lightcurve app
The first step is to download the Science Journal app.
Here it is for Apple: Science Journal
And for Android: Science Journal
If you’re asked, make sure to allow the app access to your camera (you’ll need it to make your light curves!)

Start your experiment
At the bottom right of your screen you should see a “+” symbol. Click on it to start your new experiment.
Within the experiment you can take notes and use your smart device to collect data.
Start collecting light curve data
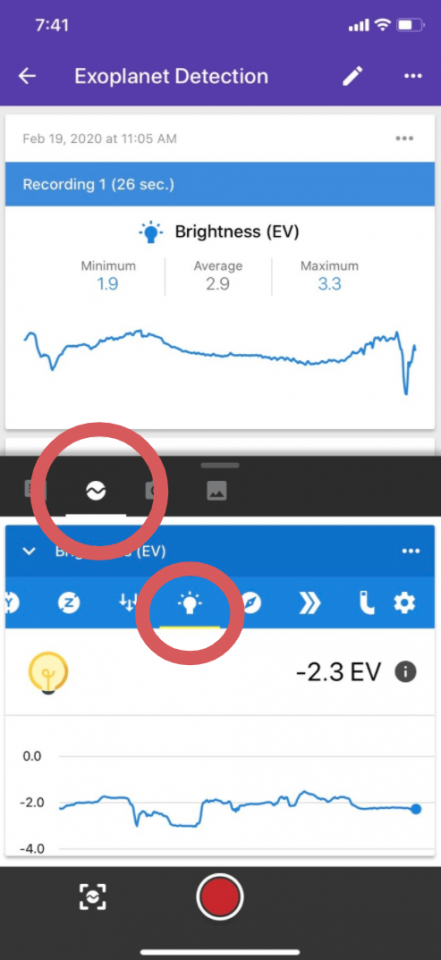
You’ll be using your smartphone to measure brightness. To do this, click on the circle with a little wave in it, then on the lightbulb.
Your phone will start showing you a graph of how bright it is, and the graph will change over time. The phone looks forward when it is measuring brightness.
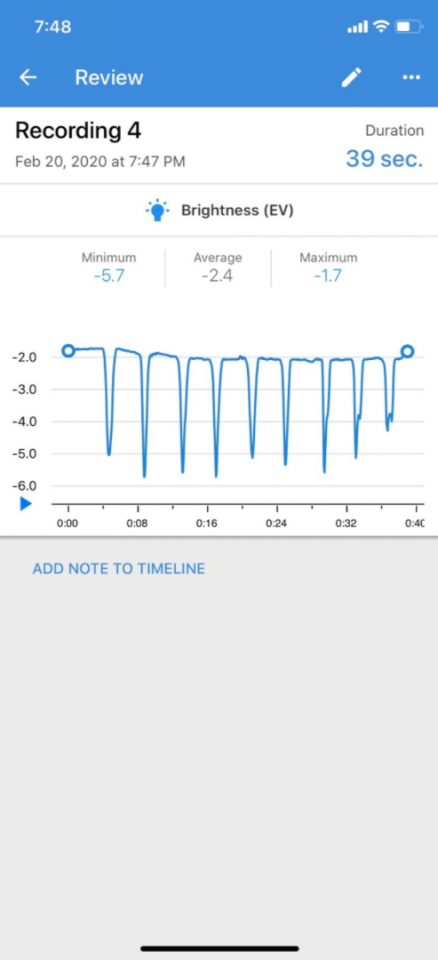
Try pointing the phone in different directions, or turning on and off the lights to see how the curve changes. This graph is what we call a lightcurve. Press the red button to create a recording of your lightcurve.
Create your light curve!
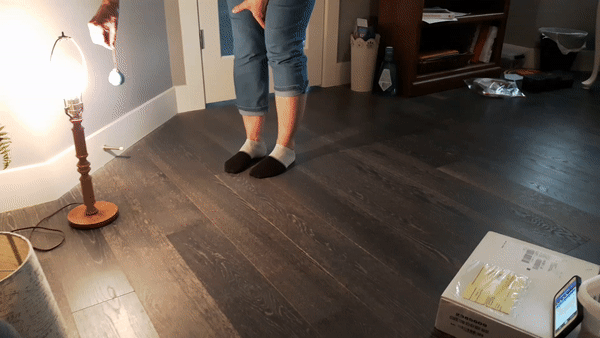
For this step you’ll need a light source, like a flashlight or small lamp. You’ll also need something that will act as your planet – this could be a ball, lollipop, or any small object. Its good if your planet is attached to a string or stick so your hand doesn’t get too close to the light.
With your phone pointed at the light source, rotate your small object around the light source. When the object blocks off the path from the light source to the phone, the brightness measured by the phone will drop.
Try experimenting with different objects, and passing them closer or further from the source. How does the light curve change? Also check out the activity sheet for more ideas on what to test out!
Share your light curve!
You can take a screen shot of your phone to share with us, or make a drawing of your light curve! Use the submission form below to send us your picture or drawing.
Also feel free to take photos or make a video of your set up and tell us more about how you create the light curve, and send them in with your light curve!
Questions?
If you have any questions, let us know! You can reach us using the comments section at the end of this page, send us an email at outreach@phas.ubc.ca, or message us on our Instagram post for this particular challenge. We look forward to hearing from you soon!
Share your design with us!
You can submit a video, photo, or drawing of your instrument here (click on “submit your design”) or tagging #PHASExoplanet @UBCphasoutreach on Instagram. We’ll share your post and send you back feedback on your project! Remember to tell us about the physics of your project in the video.
Good luck!
Submit your design
Check out some cool submissions below
This submission is by Saiprasad, who built an imaginary exoplanet (P3-L) for our #PHASExoplanet challenge activity using Minecraft (!!). This exoplanet is part of the solar system L6-R2, which he created for our previous solar system challenge activity. You can find out how he build the solar system via his other video.
On the planet is an immersive lab over an astroid crash site where scientists can run experiments to learn more about the planet and how plants (grass and trees) grow there. It’s complete with a library, scientists’ quarter, solar panels for energy generation, and a rocket and its launch pad! Exceptional work, Saiprasad!