Tips for using this guide: This guide is meant to be self-guided for students above grade 8. Students between grade 3-7 might need some guidance (download worksheet: pdf or docx), and students under grade 3 will need teacher/parent assistance (download worksheet: pdf or pptx).
Have you been following the news of recent rocket launches into space? Ever imagine becoming an astronaut one day and flying into space? Do you know how rockets work, and how they send astronauts and necessary supplies off our earth and into space?
So far, everyone who has gone to space has travelled using a rocket. Rockets work by pushing gas or liquid downward out of their engines, which then pushes on the rocket and makes it go upwards. In this activity, you’ll learn about the physics behind how rockets work, and then get to design and build your own!
Questions? Let us know – Your questions will be answered by UBC physicists, as well as the UBC Rocket Team! You can contact us by leaving a comment on this website, emailing us, or reaching out on our social media channels @ubcphasoutreach. We will also showcase your rocket on this page or via social media – you can share using a drawing or a photo of your work, or a video of how your rocket launching into the sky!
This video is a great introduction on how rockets work:
Check out this launch video of the rocket built by the UBC Rocket Team!
“Sky-Pilot was UBC Rocket’s competition rocket for the Intercollegiate Rocket Engineering Competition 2019 in New Mexico. Sky-Pilot flew up to 26,000 feet and placed 3rd in the 30,000 foot category with everything except the engine designed and manufactured by our team.”
Things you need for creating your own rocket:
- This webpage. We’ve chosen a few key ideas in physics that will help create your own rocket.
- Pencil and paper to design your rocket.
- Supplies. Check the “Materials” section below for a list of supplies. All supplies are available from a craft store or from your home.
- Safety first. Make sure you use safe materials! If you are not sure, ask adults for help. There are some additional safety requirement for this challenge – make sure you follow the instructions and stay safe!
- Make it a group project! Make your own rocket, and compare yours with others to see how high you can reach, or how long your rocket stays in air!
Physics of rockets!
An airplane uses the air to stay up and to move forward, and a car needs to be touching the ground to push itself forward with wheels. A rocket is different – even in the emptyness of space, with no air or ground to help it out, a rocket can push itself forwards! How does the rocket do it? Check out the sections below to find out.
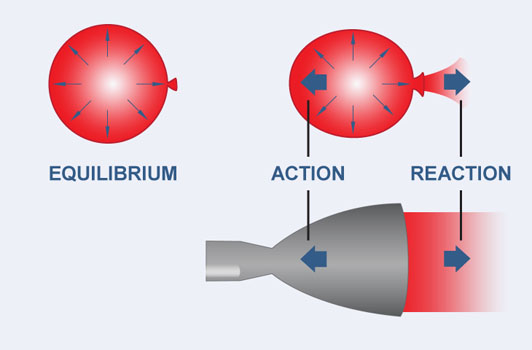
Action and reaction
In a rocket engine, gas is pushed down, and the rocket moves up. This happens because when the rocket pushes on the gas to send it down, the gas pushes back on the rocket, sending it up. In fact one of the laws of physics says that every action has an equal and opposite reaction, so this doesn’t just happen for rockets. When you throw a basketball you push the ball in one direction, but the ball pushes back on you in the opposite direction. Here are some demonstrations of action and reaction – through jetpacks, rockets, and in space!
Explore and experiment: Want to try out Newton’s 3rd law like Astronaut Mark Vande Hei in the video? You can do that with this scratch simulation! Click on the green flag to start.
If you have balloons at home, you can also try making a simple homemade balloon rocket to see how action/reaction works – blow up a balloon but don’t tie up the end, then let it go. The air will be pushed out the back, and that pushes the balloon forward. Try it yourself!
Pressure
How does a rocket push gas out from its engine? Rocket engines use a chemical reaction that changes the rocket fuel from a solid or liquid to a gas. The gas occupies a lot of volume compared to solid or liquid, but the engine is small, so the gas has a high pressure. This is like pushing air into your cheeks – the push you feel on the inside of your cheeks is the pressure of the air. The high pressure of the gas pushes it out the back of the engine.
Because every action has an equal and opposite reaction, when the highly pressurized gas comes out from the back of the rocket, it pushes the rocket forward!
Explore and experiment: Try blowing up a balloon. When you blow air into the balloon, you’ll feel the air pushing back on you. This is the pressure of the air that you’re feeling. It’s that same pressure that pushes the air out the back of the balloon when you let go!
Also, try using this PhET simulation to heat up a solid and turn it into a gas. What do you notice about how much volume it occupies? What about its pressure?
Air resistance
As a rocket moves upwards off the ground, it has to push the air above it out of the way. The force necessary to push the air out of the way is called air resistance. The larger the area of the rocket the higher air resistance will be, so a thin rocket will have a lower air resistance than a thicker one. You can also reduce air resistance by changing the rockets shape – giving a rocket a pointy top for example can help lower the air resistance.
Aerodynamic Stability
You might have noticed that a lot of rockets have fins on the bottom. Do you know why this is?
Fins help keep the rocket moving straight. This is because with fins attached, a rocket that tilts a little bit sideways will be pushed straight again. The fins use the pressure of the air pushing on them to do this. You can learn more about how this works by watching the video on the right!
Mass changes (advanced)
The lighter a rocket is, the faster the upward push of the rocket engine will make the rocket go. In fact, the acceleration of the rocket is given by the equation:
Acceleration = Force / Mass
The force is provided by the rocket engine, and the mass is the mass of the rocket plus all the fuel that is inside the rocket. That means that a lighter rocket will accelerate more, and so end up going higher. It also means that as the fuel is used up and the rocket gets lighter, the rocket will have a higher acceleration.
Experiment and explore: Test this out in this Scratch rocket simulator! You can try adjusting the mass of the rocket to see how it changes the acceleration. Also watch to see if the acceleration gets larger or small when the rocket is holding less fuel.
Here is how you can use the simulation on the right:
Press on the green flag to give it a try yourself!
Exhaust velocity (advanced)
Remember that when the rocket pushes its exhaust downwards, the exhaust pushes upwards on the rocket. In fact, the faster the rocket pushes out the exhaust, the larger force there will be pushing up on the rocket.
One way to understand this is using momentum. Momentum is something that all moving things have. The more massive or faster they are going, the more momentum. In math
momentum = (mass) x (velocity).
Because pushing the exhaust out the back of the engine pushes back on the rocket, the rocket will actually get the same amount of upward momentum as the exhaust gets downward momentum. So, if the rocket pushes the exhaust with higher velocity, the exhaust will have more momentum, and so the rocket will get more momentum too. You can explore how changing the rocket’s exhaust velocity changes how the rocket moves using our simulator. If you try clicking “change rocket” you’ll be able to increase the speed of the exhaust!
Here is how you can use the simulation on the right:
Press on the green flag to give it a try yourself!
Build your own Rocket!
Using what you’ve learned above, you can launch your very own home-made rocket! Explore the sections below to find out about the different ways you can create your own rocket, then be sure to share your creation with us on social media or using the form below!
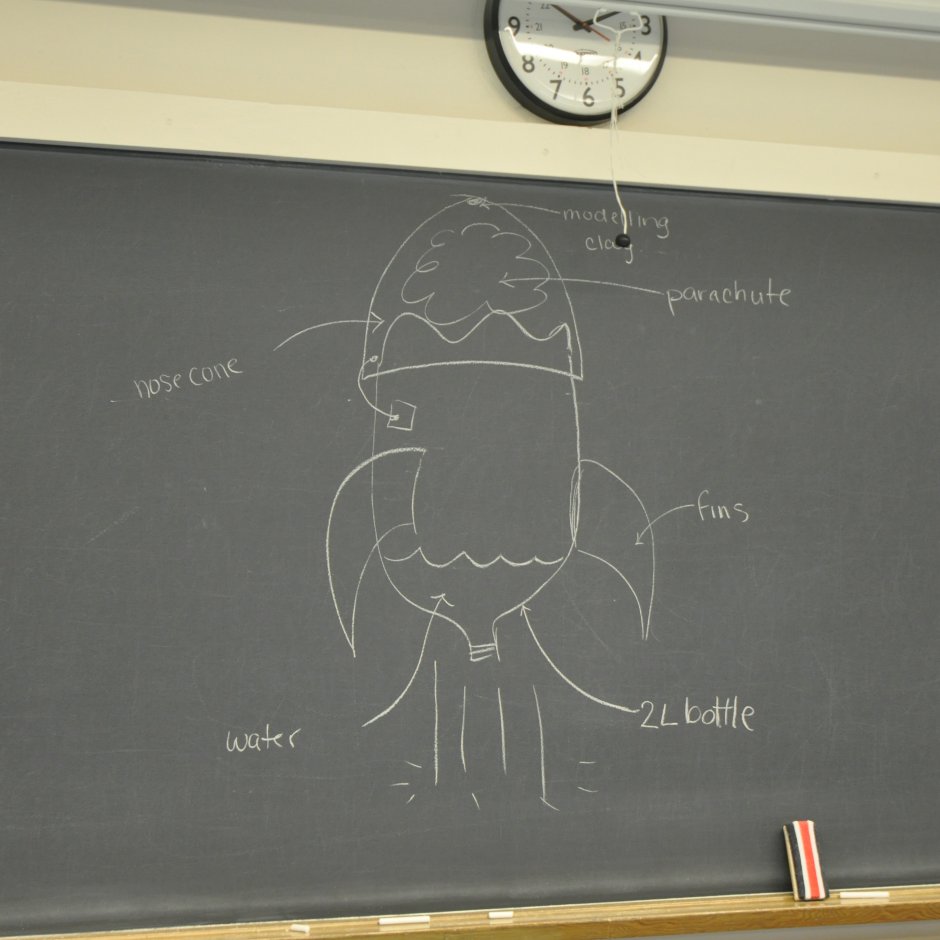
The design
Our rocket design looks like the picture below. A water bottle is partly filled with water. Using a chemical reaction, the pressure of the gas in the rest of the bottle will build up. The bottle is closed with a cork. When the pressure gets too high, the cork will pop out, and water will get pushed out the bottom of the bottle. This then pushes the bottle up!

If you’d like to see what your rocket will be able to do when its done, check out the video below (also in slow mo)!
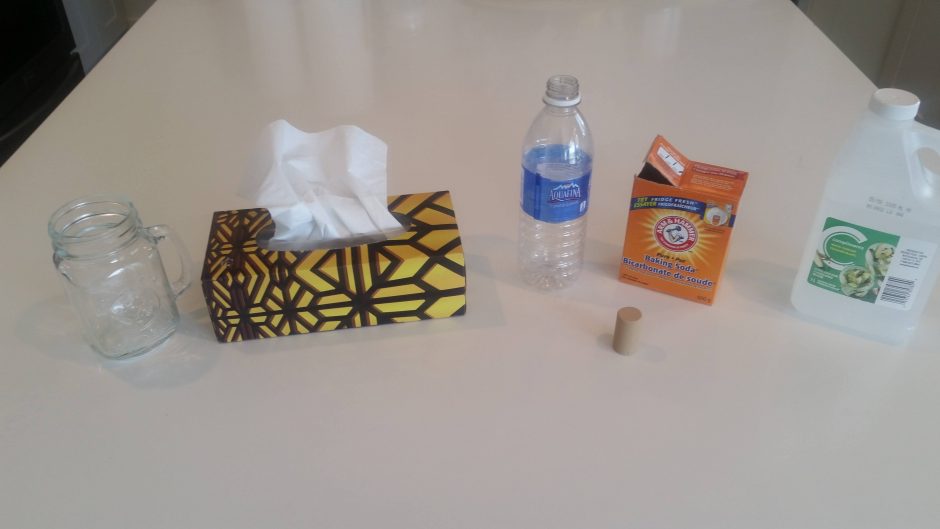
Materials
To build your rocket, you will need
- A plastic bottle (between 500ml and 2L)
- A cork – the synthetic kind works best. You can get these at a craft store or at a “Make your own wine” store.
- Rocket fuel – you can use either Alka-Seltzer tablets (available at the pharmacy, it will cost about $1 per launch of a 500ml bottle), or baking soda and vinegar.
- A cup or jar, big enough for your water bottle to sit in upside down. This will work as our rocket holder.
- If you are using baking soda and vinegar, you will also need Kleenex tissues.
If you’d like to experiment with your rockets design to try to make it go higher, you can also use
- Scissors
- Paper – heavy cardstock works best
- A plastic file folder
- Glue or tape
Building your rocket
To help your rocket go as high as possible, you might want to reduce the air resistance. You can do this by adding a nose cone. A nose cone is a pointy bit that sits on top of your rocket, and helps it move through the air more easily. You can build your nose cone out of paper or plastic file folders.
You can also add fins to your rocket. These help the rocket go straight up by improving its stability. You can build fins out of heavy paper or plastic file folders. Attach them to the side of your rocket using tape or glue.
Lastly, if you are very adventurous, you can also add a parachute to make sure your rocket lands softly. The parachute is usually a plastic bag folded and hidden into the partially seal nose cone.
The overall design will look like the image on the right! At this point, DO NOT put the rocket fuel in yet – we will need to head to a launch pad first!
Launch your rocket!
To launch your rocket, you’ll need to go outside. First, find a place to set up your “launch pad.” Some important rules:
- Make sure to find somewhere with no trees or buildings overhead so your rocket has room to fly.
- The launch pad should be away from crowds – make sure your rocket won’t hit something on the way up or down!
- Lay down a tray, tarp, or garbage bag as your launch pad, and put the cup/jar in the middle of the launch pad. This will help you catch some of the exhaust and keep the environment clean (especially if you are using baking soda and vinegar) when we finish up!
- Bring a bucket of water with you for easy refill!
In the videos below we show you the detailed steps for launching your rocket.
SAFETY FIRST!
Once you put the stopper on, place your rocket into the rocket holder and step away immediately. It might take some time for the rocket to launch – be patient! If you need to check on the rocket, make sure that you do step right over the rocket as the rocket could unexpectedly shoot up and hit your face – it is very dangerous!
Here are the instructions for the baking soda and vinegar rocket.
If you have access to some alka seltzer tablets, you can make a similar rocket using the tablets. Note that it costs about $1/rocket launch! Make sure you have your guardians’ approval before using these tablets.
Pop Rocket and other designs
Another fun rocket you can make is a “Pop!” rocket. This type of rocket uses a small container with a snap on lid, like a film canister or craft container (for an example, see here). By placing an Alka-Seltzer tablet in the container along with some water, gas pressure builds up inside until it pops the lid off. The lid and water being pushed downwards then pushes the container upwards!
There are also lots of other build-at-home rocket designs out there. Here are a few of our favourites:
- Stomp rockets – video 1, video 2, video 3
- Water propelled rockets using a bike pump (Advanced) – video 1
- Rocket balloons
Additional resources (for guardians and teachers)
Questions?
If you have any questions, let us know! You can reach us using the comments section at the end of this page, send us an email at outreach@phas.ubc.ca, or message us on our Instagram post for this particular challenge. We look forward to hearing from you soon!
Share your design with us!
You can submit a video, photo, or drawing of your rocket here (click on “submit your design”) or tagging #PHASRocket @UBCphasoutreach on Instagram. We’ll share your post and send you back feedback on your rocket!
Good luck!